Spring Pastel Nails

I know I say this everytime I post something nail art related, but it really has been a while since I’ve posted! I have a good three weeks left until this semester is over! I’m excited, but now it’s crunch time!

Anyway! It’s officially spring! I don’t know about you, but when I think about spring, I automatically think of floral prints and pastels. I guess you can say that the change in season has been the inspiration for my last two nail designs. I wanted to quickly share one design, and then share a tutorial for the design that I currently have on!

Here they are:

This first design, I had on my nails about a week ago. They were my “Easter nails” 🙂 I kept the deisng pretty simple, using these tools to accomplish the design:

1. Light Pink Polish – “Bare” by Sinful Colors (I purchased mine from a local Walgreens for $1.99.)

2. Clear Top Coat“Dries Instantly Top Coat” by Sally Hansen (I purchased mine from a local CVS.)

3. Nail art pen/brush in the color white“2 Way Nail Art Pen” by KONAD (I purchased mine from a local CVS.)

Now! For the tutorial:

Tools needed to achieve this design:

1. Minty Green Nail Polish – I’m not sure what the name of the shade is called, but it is the Love & Beauty brand by Forever 21.

2. Light Blue Nail Polish/Turquoise Nail Polish – “I Need a Refresh” by Wet n Wild

3. Clear Top Coat – “Dries Instantly Top Coat” by Sally Hansen

4. Nail art pen/brush in the color white“2 Way Nail Art Pen” by KONAD

Let’s Get Started!

1. First, apply 2-3 coats of the minty green polish on each of your finger nails. In my case, I had to apply three coats just because the polish that I was using was very sheer.

2. Wait about 5 minutes for nails to dry.

3. After the minty green polish has dried, use the light blue/turquoise polish and paint a strip of it in the center of each nail. In the photos above, I just did one coat.

4. Wait 2-3 minutes for nails to dry.

5. Now, using the brush on the 2 Way Nail Art Pen/Brush, paint a white line/stripe where the two colors meet. So, you should have two stripes on each nail.

6. You could leave the design as is, or you could add something extra, like I did. As you can see in the photo above, I decided to add extra lines to my ring finger. I thought it added some “character” to the design ;D.

7. Once everything is dry, be sure to apply a top coat for long lasting nails!

;

Hope you enjoyed this tutorial 🙂 Happy nail designing!


20120413-181523.jpg
Here’s a photo that I posted to my Instagram! Follow me there as well ^_^ @rheaamayyy

Ready for Spring, Refreshing Tangerine!

In my last post, I basically went over the fact that the color tangerine is becoming such a trend for spring this year. I currently have, on my nails, my take on this trend & I thought I’d share it with you all!

The inspiration for my nails actually came from a YouTube guru named, Heart. I do follow her on Twitter and a few days ago, she posted a photo of her nails, via her Instagram. Here’s the photo:

(Find more on Heart here: YouTube, Twitter, Instagram: thatsheart)

After seeing this photo, I decided to create my own version of these nails. To achieve my own look, these are the products that I used:

1. “Tangerine Crush” by L’Oreal 

2.  “I Need a Refresh” by Wet n Wild

3. “Dries Instantly Top Coat” by Sally Hansen

4. “2 Way Nail Art Pen” by KONAD

I played with her design a bit and these are the end results:

I think these two colors are great for spring! Compared to Heart’s nails, the colors that I chose are a lot more brighter and of course, I just had to use my 2 Way Nail Art Pen to add some sort of design!

Hope you all enjoyed this!

Remember, inspiration is all around you! Happy nail designing! 🙂

Half a Coat of Glitter

So! It’s been a little over a week since I last posted! I blame the fact that I was on Spring break during the past week! Lol, anyway…

I’m sure many of you know of or have seen the glitter-on-half-your-nail trend. I’ve always wanted to try it out for myself… so this next nail tutorial is based on this trend. The process is pretty simple. I hope you guys enjoy!

Supplies Needed to Achieve this Design:

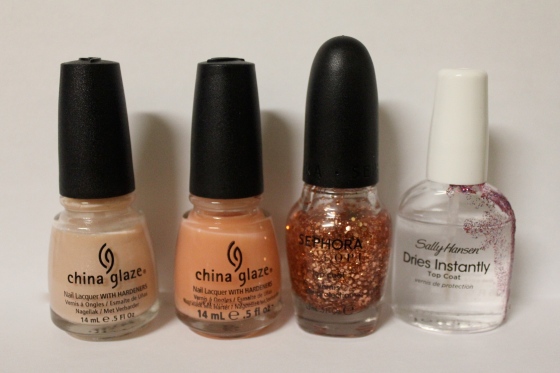
1. Nude/Light Pink Nail Polish – “Heaven” by China Glaze (I got mine from a store called Beauty Palace, or purchase here.)

2. “Love Letters” by China Glaze – I’m using this to add a pink tint to the base coat (I got mine from a store called Beauty Palace, or you can purchase it here.)

3. Glitter Nail Polish“Traffic-Stopper Copper” by SEPHORA by OPI (I got mine from a Sephora for about $10. You find the same one, or a similar one here.)

4. Clear Top Coat – “Dries Instantly Top Coat” by Sally Hansen (I purchased mine from a local CVS.)

1. First, apply the nude/pink polish to all of your nails. The polish that I used, is pretty sheer. So, I applied three coats. (The polish is a little bit more peachy pink than it appears to be in the photo.

2. Wait 2-3 minutes for the polish to dry.

3. Next, I coated each nail with the polish, “Love Letters”. This step is completely optional. It just depends on what nail polish you decide to use as your base color. This polish in particular added a pink tint to the base color, which is why I used it.

4. Wait 2-3 minutes for the polish to dry.

5. Now, to coat half of each nail with glitter….Using the glitter polish, start by holding the brush at the tip of each nail. Then, work your way down. I tried my best to have the larger pieces of glitter stay at the top of the nail, so there’s somewhat of a fade effect. (But I wasn’t really successful with that technique. Lol.)

6. Wait 3-5 minutes for nails to dry.

7. Here’s another optional step. I added two rose stickers to each of my ring fingers. Every now and then, I like to use nail art stickers just to add a little somethin’ somethin’ to my nails xP.

8. Last, but not least, go over each nail with a top coat for lasting nails!

Hope you all enjoyed this! Happy nail designing! 🙂

You Can’t Paint Without the Right (KONAD) Brush!

If you scroll through my previous posts, you’ll see that one of my favorite tools to use is my 2 Way Nail Art Pen by KONAD in the color white. I actually stumbled upon this product about two to three years ago. I was browsing through the cosmetic section at my local CVS and came across the KONAD section. At that time, I wasn’t that big on nail art, but it was something I wanted to try. So, just for the heck of it, I picked up that 2 Way Nail Art Pen. I went home that day and tried it out and I remember instantly loving it! Like I said, at that point in my life, I wasn’t the greatest at doing my nails. So to find a product that I found  easy to use…that was a magical moment. Haha.

Since then, every time I run out, I always make it a point to pick up another tube, or bottle of the 2 Way Nail Art Pen. The tube, as you can probably already tell, is a pretty skinny tube/bottle. Don’t be fooled. One tube can last you for quite some time. Trust me, I practically use this every time I decide to add some sort of design to my nails.

At one end of the tube, you can twist the top open to access the nail brush. At that same end, you can pop the cap off to access the nail pen. I find the nail brush to be a good size. It’s not so thin, but not so thick either where you’re struggling to create precise lines. The brush is very easy to maneuver and while you’re using the brush, the polish inside does not easily dry out. It’s very convenient having these two tools altogether in one pen!

Just in case, this is what it looks like :

Photo provided by KONAD

So, if you’re interested in getting your hands on a good nail art pen or brush, definitely look into these and try them out. I can almost guarantee (well, based off of my experiences anyway…) that you will not regret it! Also, you can get them online for $5.90 a tube. I believe, I purchased my first tube for almost $8! So, I’ll probably order more online, when that time comes again. Also, the 2 Way Nail Art Pen comes in different colors: check it out here. I was thinking about picking up the ones in the colors Pastel Pink and Black Pearl…

Check out KONAD’s site: Konadnailart.com


Dancing Nails & I Need A Refresh – Swatches

My friends and I went on a little adventure yesterday. While we were out, we made a stop at Walgreens. & Typical me dropped by the cosmetic section and couldn’t resist picking up two new polishes. As basic as these may seem, I didn’t already own anything that were similar to these colors. I tried them out last night and here’s what they look like:

1. Dancing Nails

This first one that I got is called “Dancing Nails“, by the brand Sinful Colors. The color is kind of a cross between a hot pink and glittery red. For some reason, (as silly as it may sound) having this color on my nails puts me in some sort of festive mood. Maybe that’s because it reminds me of Christmas. But anyway, the name of the polish matches the shade. Also, in the photos above, that’s what the polish looks like after applying two coats.

2. I Need a Refresh

The second nail polish that I got is called “I Need a Refresh” by Wet n Wild. In my opinion, this is a very nice turquoise and it actually reminds me of the Tiffany & Co. packaging. In the photos above, this is what the color looks like after two coats. The only thing I will say that I didn’t really like about this nail polish was the brush…

On the bottle, it describes the brush as a “Pro Brush/ManiCurve”. It’s supposed to help make applying the polish, easier. Although, I found it more difficult to apply the polish. I like that brush is flat, but I felt that it was too thick. The thickness makes it more proned for the polish to get onto your fingers. But other than that, I really did like the polish.

Like I mentioned, I got these polishes from Walgreens.

I couldn’t find the link to “Dancing Nails“, but here’s where you could get “I Need a Refresh“…

Walgreens.com

Oh! & here’s a little extra something. I actually did my nails today, using “I Need a Refresh” & here’s what they turned out to look like:

Half Heaven, Half Rich in Heart

Hi everyone! It’s been a whole week since I’ve last updated or posted anything. But today, I have a nail tutorial that I want to share with you all! 🙂 I actually had this design on my nails for the past week or so and I got a whole bunch of compliments on it. I hope you all enjoy this and….

Let’s get to it!

Supplies needed in order to achieve design: 

1. Nude/Light Pink Nail Polish – “Heaven” by China Glaze (I got mine from a store called Beauty Palace.)

2. Maroon/Burgundy Nail Polish – “Rich in Heart” by Sinful Colors (I got mine from a local Walgreens for $1.99)

3. Nail Art Pen/Brush in the color gold – gold Nail Liner (Not too sure of the brand. A friend of mine got it for me while in Japan)

4. Nail art pen/brush in the color white – “2 Way Nail Art Pen” by KONAD (I purchased mine from a local CVS. For this design, we’re only using the brush.)

5. Clear Top Coat – “Dries Instantly Top Coat” by Sally Hansen (I purchased mine from a local CVS.)

On to the steps!

1. First, apply two coats of the nude/light pink polish onto each of your nails. (In the photo above, I had already applied two coats of the polish, “Heaven”. You can barely tell that there’s polish on my nails, but I did this because I wanted a light base color for the design.)

2. Wait about a minute or two for the nail polish to dry.

3. Next, we’re going to use the second color, “Rich in heart” and paint half of each nail. I start by holding the brush on one side of the nail (usually the side that is closer to me) and following through at a diagonal angle. Doing this creates a thick diagonal line. After creating that diagonal line, I paint the remaining top portion of my nails.

4. Wait 3-5 minutes for nails to dry.

5. The next thing we’re going to do is create the three diagonal lines, using the nail art pen/brush. The first white line starts right where both colors meet. I start by holding the tip of the brush on the side of the nail that is closer to me and following through at a diagonal angle. I’m also sure to stop halfway.

6. Repeat step 5, two more times to create three stripes (refer to photo ^^).

7. Wait about a minute or two for the lines to dry.

8. Next, we’re going to add the gold “detailing”, using the nail liner. I first start off by adding a thin gold line along side the first white line. Then, I just painted gold lines between each white line.

9. The final produst is as seen in the photo above. Don’t forget to wait a minute or so for your nails to dry!

10. Once everything is dry, go over each nail with a top coat for long lasting nails! 😀

Good luck & happy nail desiging!